1627人加入学习
(19人评价)
Python数据分析 - Pandas玩转Excel

Python数据分析轻松学

价格 $99美元

pandas is a package

How to use pandas to create an Excel file?

DataFrame(数据帧)

DataFrame is a very important Class in pandas, a DataFrame can be treated as a worksheet in Excel. Take care of the first letter "D" is upper case.

import pandas as pd

df = pd.DataFrame({'ID':[1,2,3],'Name':['Tim','Victor','Nick']})
df = df.set_index('ID')
print(df)
df.to_excel('C:/Temp/output.xlsx')
print('Done!')

'ID' and 'Name' is the name of the column. 

[1,2,3] and ['Tim','Victor','Nick'] is the record under column ID and Name.

Code:

DataFrame.set_index('ID')

is set the column ID as the index. otherwise, the DataFrame will add an additional column as the index.

Code:

DataFram.to_excel('C:/Temp/output.xlsx')

.to_excel is a method of Class DataFrame. that will create an excel file under an absolute address.

Result:


      Name
ID        
1      Tim
2   Victor
3     Nick
Done!

Process finished with exit code 0


[展开全文]
Lewin · 2018-10-11 · 创建文件 5

 pandas 读取现有excel文件的方法:

import pandas as pd
people = pd.read_excel('c:/Temp/People.xlsx')

几个常用的方法:

  • .shape: 读取excel的总行数和总列数;
  • .columns:读取excel中所有列的标题
  • .head(n): 读取除标题外的前n行数据,默认为5行
  • .tail(n): 读取末尾n行数据,默认为5行
import pandas as pd
people = pd.read_excel('c:/Temp/People.xlsx')

print(people.shape)
print('=====================')
print(people.columns)
print('=====================')
print(people.head(3))
print('=====================')
print(people.tail(3))

输出结果为

(19972, 6)
=====================
Index(['ID', 'Type', 'Title', 'FirstName', 'MiddleName', 'LastName'], dtype='object')
=====================
   ID      Type Title FirstName MiddleName    LastName
0   1  Employee   NaN       Ken          J     Sánchez
1   2  Employee   NaN     Terri        Lee       Duffy
2   3  Employee   NaN   Roberto        NaN  Tamburello
=====================
          ID                 Type Title FirstName MiddleName LastName
19969  20775  Individual Customer   NaN   Crystal          S       He
19970  20776  Individual Customer   NaN   Crystal        NaN    Zheng
19971  20777  Individual Customer   NaN   Crystal        NaN       Hu

集中常见的特殊情况:

1. 当目标文件的首行不是我们想要的header的时候。需要自定义header的行。

注:编程语言的编号是从0开始的,而excel的行号是从1开始的。

例如:目标文件的header行是exel的第二行,那么代码如下:

import pandas as pd
people = pd.read_excel('c:/Temp/People.xlsx',header=1)

print(people.columns)

2。 当目标文件没有header的时候,此时需要pandas我这个文件没有header

代码如下:

import pandas as pd
people = pd.read_excel('c:/Temp/People.xlsx',header=None)

print(people.columns)

这样pandas将默认用整数字来作为header。如上代码输出如下:

Int64Index([0, 1, 2, 3, 4, 5], dtype='int64')

 此时要想再给目标文件添加header的话,代码如下:

import pandas as pd
people = pd.read_excel('c:/Temp/People.xlsx',header=None)
people.columns=['ID','Type','Title','FirstName','MiddleName','LastName']
print(people.columns)

打印结果

Index(['ID', 'Type', 'Title', 'FirstName', 'MiddleName', 'LastName'], dtype='object')

注:此时虽然我们在程序里面为目标文件添加了header,但实际上并没有写入目标文件people.xlsx

如果想要将增加了header的文件在实际文件里体现,有两种方法:

方法1: 输出到一个新的文件

代码如下:

import pandas as pd
people = pd.read_excel('c:/Temp/People.xlsx',header=None)
people.columns=['ID','Type','Title','FirstName','MiddleName','LastName']
print(people.columns)

people.to_excel('C:/Temp/output.xlsx')
print('done!')

注:此时输出的新目标文件包含了我们刚才在程序里面定义的header,同时系统也自动为新文件增加了默认的索引。

我们需要将“ID”指定为索引:

------------复习指定索引------------

import pandas as pd
people = pd.read_excel('c:/Temp/People.xlsx',header=None)
people.columns=['ID','Type','Title','FirstName','MiddleName','LastName']
people = people.set_index('ID')
print(people.columns)

people.to_excel('C:/Temp/output.xlsx')
print('done!')

此方法的一个特点是需要产生一个新的DataFrame,然后在通过people这个变量来重新引用它

--------------复习结束--------------

指定索引的另外一种方式:直接在当前DataFrame上进行修改。

代码如下:

people = pd.read_excel('c:/Temp/People.xlsx', header=None)
people.columns = ['ID', 'Type', 'Title', 'FirstName', 'MiddleName', 'LastName']
people.set_index('ID', inplace=True)
print(people.columns)

people.to_excel('C:/Temp/output.xlsx')
print('done!')

注意:此时的“ID”列已经被定义为了“index”,在我们打印columns的时候index的列名是不会被打印的。


***当我们在使用pandas.read_excel方法读取一个现有的excel文件的时候如果知道该文件的哪一列为index列,则需要指定出来,否则程序会在读取后自动为目标文件添加一个默认的index列。

代码示例:

import pandas as pd

df = pd.read_excel('C:/Temp/output.xlsx',index_col='ID')
df.to_excel('C:/Temp/output2.xlsx')
print('done!')


[展开全文]
Lewin · 2018-10-09 · 读取文件 4

任务5: 填充日期序列

首先对于日期的递增有三种方式,

a. 年递增,b. 月递增, c. 日递增

1. 日递增

books['Date'].at[i] = start + timedelta(days=i)

打印结果:

    ID      Name InStore        Date
0    1  Book_001     Yes  2018-01-01
1    2  Book_002      No  2018-01-02
2    3  Book_003     Yes  2018-01-03
3    4  Book_004      No  2018-01-04
4    5  Book_005     Yes  2018-01-05
5    6  Book_006      No  2018-01-06
6    7  Book_007     Yes  2018-01-07
7    8  Book_008      No  2018-01-08
8    9  Book_009     Yes  2018-01-09
9   10  Book_010      No  2018-01-10
10  11  Book_011     Yes  2018-01-11
11  12  Book_012      No  2018-01-12
12  13  Book_013     Yes  2018-01-13
13  14  Book_014      No  2018-01-14
14  15  Book_015     Yes  2018-01-15
15  16  Book_016      No  2018-01-16
16  17  Book_017     Yes  2018-01-17
17  18  Book_018      No  2018-01-18
18  19  Book_019     Yes  2018-01-19
19  20  Book_020      No  2018-01-20


2. 递增年

books['Date'].at[i] = date(start.year+i,start.month,start.day)

打印结果:

    ID      Name InStore        Date
0    1  Book_001     Yes  2018-01-01
1    2  Book_002      No  2019-01-01
2    3  Book_003     Yes  2020-01-01
3    4  Book_004      No  2021-01-01
4    5  Book_005     Yes  2022-01-01
5    6  Book_006      No  2023-01-01
6    7  Book_007     Yes  2024-01-01
7    8  Book_008      No  2025-01-01
8    9  Book_009     Yes  2026-01-01
9   10  Book_010      No  2027-01-01
10  11  Book_011     Yes  2028-01-01
11  12  Book_012      No  2029-01-01
12  13  Book_013     Yes  2030-01-01
13  14  Book_014      No  2031-01-01
14  15  Book_015     Yes  2032-01-01
15  16  Book_016      No  2033-01-01
16  17  Book_017     Yes  2034-01-01
17  18  Book_018      No  2035-01-01
18  19  Book_019     Yes  2036-01-01
19  20  Book_020      No  2037-01-01

3. 递增月

注:月份没有最多只有12个月,超过12个月则年增加1. 

学一个小算法:

f add_month(d, md):
    yd = md // 12
    m = d.month + md % 12
    if m != 12:
        yd += m // 12
        m = m % 12
    return date(d.year + yd, m, d.day)

注:  d:日期, md: 增加的月份, yd: 年份增加, m:月份。

递增月代码

 books['Date'].at[i] = add_month(start, i)

打印结果

    ID      Name InStore        Date
0    1  Book_001     Yes  2018-01-01
1    2  Book_002      No  2018-02-01
2    3  Book_003     Yes  2018-03-01
3    4  Book_004      No  2018-04-01
4    5  Book_005     Yes  2018-05-01
5    6  Book_006      No  2018-06-01
6    7  Book_007     Yes  2018-07-01
7    8  Book_008      No  2018-08-01
8    9  Book_009     Yes  2018-09-01
9   10  Book_010      No  2018-10-01
10  11  Book_011     Yes  2018-11-01
11  12  Book_012      No  2018-12-01
12  13  Book_013     Yes  2019-01-01
13  14  Book_014      No  2019-02-01
14  15  Book_015     Yes  2019-03-01
15  16  Book_016      No  2019-04-01
16  17  Book_017     Yes  2019-05-01
17  18  Book_018      No  2019-06-01
18  19  Book_019     Yes  2019-07-01
19  20  Book_020      No  2019-08-01

4. 文件输出保存

将编辑好的DataFrame输出保存,注意设定‘ID’为index

import pandas as pd
from datetime import date, timedelta


def add_month(d, md):
    yd = md // 12
    m = d.month + md % 12
    if m != 12:
        yd += m // 12
        m = m % 12
    return date(d.year + yd, m, d.day)


books = pd.read_excel('C:/Temp/Books.xlsx', skiprows=3, usecols='C:F', index_col=None,
                      dtype={'ID': str, 'InStore': str, 'Date': str})

start = date(2018, 1, 1)

for i in books.index:
    books['ID'].at[i] = i + 1
    books['InStore'].at[i] = 'Yes' if i % 2 == 0 else 'No'
    books['Date'].at[i] = add_month(start, i)
books.set_index('ID', inplace=True)
books.to_excel('C:/Temp/output.xlsx')
print('done!')

5. 另外一种改值的方法

上面介绍了使用Series的at[]方法找到对应的值进行修改。

我们也可以直接用DataFrame的at[]方法进行修改。

代码修改如下:

import pandas as pd
from datetime import date, timedelta


def add_month(d, md):
    yd = md // 12
    m = d.month + md % 12
    if m != 12:
        yd += m // 12
        m = m % 12
    return date(d.year + yd, m, d.day)


books = pd.read_excel('C:/Temp/Books.xlsx', skiprows=3, usecols='C:F', index_col=None,
                      dtype={'ID': str, 'InStore': str, 'Date': str})

start = date(2018, 1, 1)

for i in books.index:
    books.at[i, 'ID'] = i + 1
    books.at[i, 'InStore'] = 'Yes' if i % 2 == 0 else 'No'
    books.at[i, 'Date'] = add_month(start, i)
books.set_index('ID', inplace=True)
books.to_excel('C:/Temp/output.xlsx')
print('done!')


[展开全文]

Series

在pandas里面,行和列都可以用一种数据结构Series来表示。

1. 如何生成一个序列对象:

import pandas as pd

s1 = pd.Series()

注:该序列对象为空

2. Series里面几个比较重要的属性

  • Series.data   (以后将被禁用)
  • Series.name
  • Series.index

Dictionary 字典

Dictionary是由一系列的keys,values, pairs组成的。

1. 如何生成一个Dictionary

import pandas as pd

d = {'x':100,'y':200,'z':300}

注:

  • 'x', 'y', 'z' 是字典d的keys。 
  • 100, 200, 300 是字典d的values。

2. Dictionary 里的keys, values

  • 可以通过以下方法来检验keys和values:
d={'x':100,'y':200,'z':300}

print(d.keys())
print(d.values())

得到结果;

dict_keys(['x', 'y', 'z'])
dict_values([100, 200, 300])
  • 通过keys来访问对应的values
d={'x':100,'y':200,'z':300}

print(d['x'])

得到结果

100


创建Series的两种方法:

1. 通过Dictionary来创建Series

Code:

d={'x':100,'y':200,'z':300}

s1 = pd.Series(d)

注:

加入后对应的转换关系:

Dictionary                  Series

keys         -------->      index

values      --------->     data(not available)

验证一下对应关系如下:

d={'x':100,'y':200,'z':300}
s1 = pd.Series(d)

print(s1.index)
print(s1)

得到结果

Index(['x', 'y', 'z'], dtype='object')
x    100
y    200
z    300


2. 通过分别指定data和index来创建Series

s1=pd.Series([100,200,300],index=['x','y','z'])
print(s1.index)
print(s1)

得到结果

Index(['x', 'y', 'z'], dtype='object')
x    100
y    200
z    300


通过DataFrame来定义Series的行和列

Series本身不具体行和列的属性,但可以通过DataFrame来指定。Series加入到DataFrame的方式不同,其对应的行列也不同,

----复习一下DataFrame语句------------------

pandas.DataFrame(columnName:columnData)

----复习结束---------------------------------

首先创建三个Series

import pandas as pd

s1 = pd.Series([1,2,3],index=[1,2,3],name='A')
s2 = pd.Series([1,2,3],index=[1,2,3],name='B')
s3 = pd.Series([1,2,3],index=[1,2,3],name='C')

注:这里每一个Series都包含了data,index,name三个完整的属性。

1. 通过字典的方式加入DataFrame

s1 = pd.Series([1,2,3],index=[1,2,3],name='A')
s2 = pd.Series([1,2,3],index=[1,2,3],name='B')
s3 = pd.Series([1,2,3],index=[1,2,3],name='C')

df=pd.DataFrame({s1.name:s1, s2.name:s2, s3.name:s3})

注:转换后的对应关系

Series                Dictionary          DataFrame

S1.name   --->   Dic.Keys---> columnName

S1.data    ---->   Dic.Values--->columeData

打印后的到结果

   A  B  C
1  1  1  1
2  2  2  2
3  3  3  3

2. 通过list的形式加入到DataFrame

s1 = pd.Series([1,2,3],index=[1,2,3],name='A')
s2 = pd.Series([1,2,3],index=[1,2,3],name='B')
s3 = pd.Series([1,2,3],index=[1,2,3],name='C')

df=pd.DataFrame([s1,s2,s3])

注:

这里的series在DataFrame里面是以行的形式存在的,name成立index

打印后得到结果

   1  2  3
A  1  2  3
B  1  2  3
C  1  2  3


[展开全文]

任务4:数据区域的读取,填充整数,文字

首先要在pandas环境下读取一个现有的excel文件。

books = pd.read_excel('C:/Temp/Books.xlsx')

当读取的目标文件数据的起始点不在首行和首列的时候,pandas会从Excel的A1单元格开始读取,目标excel中的空白区域在打印时会显示“NaN”即“Not a  Number".  这是我们不想看到的,要想真实的还原目标Excel的内容区域就需要手动改变pandas的读取位置。

手动指定pandas的读取区域

几个关键属性:

skiprows=n: 跳跃n行,即数据从第n+1行开始

usecols="C:F": 内容所在的列区域为excel的C到F

books = pd.read_excel('c:/Temp/Books.xlsx', skiprows=3,usecols='C:F',index_col=None)

注意:这里不指定ID为index的目的是我们后面要对ID的列内容进行写入编辑。

1. 填充ID列

一个DataFrame其每一列其实就是一个Series

验证方法:

print(type(books['ID']))

打印结果:

<class 'pandas.core.series.Series'>

Series 的 at[n] 函数

其中n代表Series里面的第n个元素。

给books里面ID列的第一个元素赋值可以这样写:

books['ID'].at[0] = 100

有了这个函数方法,对于ID列作等差天聪的话我们就可以用 for循环来做:

for i in books.index:
    books['ID'].at[i] = i + 1

注:此时打印出来的ID列值不是整数而是浮点类型。因为之前的空白区域被读取并用NaN填充后被程序自动将属性设置为了float64类型。将ID列修改整数的办法是在读取的时候指定dtype。

books = pd.read_excel('C:/Temp/Books.xlsx', skiprows=3, usecols='C:F', index_col=None,
                      dtype={'ID': str, 'InStore': str, 'Date': str})

注:之所以不用int是因为float无法向int转换。

2. 填充InStore

books['InStore'].at[i] = 'Yes' if i % 2 == 0 else 'No'

3. 填充Date

首先需要调用datetime这个模块,同时引入该模块里的‘date’和‘timedelta’两个类。

设定一个起始日期

start = date(2018, 1, 1)

为每行填充一个相同的日期可以这样写:

books['Date'].at[i] = start

该节的代码入下 :

import pandas as pd
from datetime import date, timedelta

books = pd.read_excel('C:/Temp/Books.xlsx', skiprows=3, usecols='C:F', index_col=None,
                      dtype={'ID': str, 'InStore': str, 'Date': str})

start = date(2018, 1, 1)

for i in books.index:
    books['ID'].at[i] = i + 1
    books['InStore'].at[i] = 'Yes' if i % 2 == 0 else 'No'
    books['Date'].at[i] = start

print(books)

打印结果

    ID      Name InStore        Date
0    1  Book_001     Yes  2018-01-01
1    2  Book_002      No  2018-01-01
2    3  Book_003     Yes  2018-01-01
3    4  Book_004      No  2018-01-01
4    5  Book_005     Yes  2018-01-01
5    6  Book_006      No  2018-01-01
6    7  Book_007     Yes  2018-01-01
7    8  Book_008      No  2018-01-01
8    9  Book_009     Yes  2018-01-01
9   10  Book_010      No  2018-01-01
10  11  Book_011     Yes  2018-01-01
11  12  Book_012      No  2018-01-01
12  13  Book_013     Yes  2018-01-01
13  14  Book_014      No  2018-01-01
14  15  Book_015     Yes  2018-01-01
15  16  Book_016      No  2018-01-01
16  17  Book_017     Yes  2018-01-01
17  18  Book_018      No  2018-01-01
18  19  Book_019     Yes  2018-01-01
19  20  Book_020      No  2018-01-01


关于填充日期的递增方法请看下集


[展开全文]

任务7: 排序,多重任务

关于对DATa Frame里面不同列(Series)的排序主要用到一个DataFrame的一个函数 ".sort_values()"

.sort_values()函数里的几个成员的解释

by=【'column1','column2'】 :指定需要排序的目标列,以及排序的先后顺序。

inplace= True:与.set_index里的功能一样,避免再次生成一个DataFrame。

ascending=[True,False]: 【】里面的成员数量要与by[]里面的成员对应。表示从大到小或从小到大排列。

本节代码:


import pandas as  pd

products = pd.read_excel('C:/Temp/List.xlsx', index_col='ID')

#products.sort_values(by='Price', inplace=True, ascending=False)
products.sort_values(by=['Worthy', 'Price'], inplace=True, ascending=[True, False])
print(products)

打印结果

           Name  Price Worthy
ID                           
18  Product_018  11.22     No
15  Product_015  10.31     No
3   Product_003   9.62     No
9   Product_009   8.98     No
6   Product_006   7.34     No
12  Product_012   7.29     No
2   Product_002  11.99    Yes
17  Product_017  11.95    Yes
8   Product_008  11.14    Yes
4   Product_004  11.08    Yes
7   Product_007  10.97    Yes
19  Product_019  10.95    Yes
16  Product_016  10.26    Yes
1   Product_001   9.82    Yes
10  Product_010   9.18    Yes
14  Product_014   9.16    Yes
20  Product_020   8.82    Yes
13  Product_013   8.36    Yes
11  Product_011   8.31    Yes
5   Product_005   7.75    Yes


[展开全文]

任务6: 函数填充

首先定义一个DataFrame “books”,并导入现有excel文件Books.xlsx

books = pd.read_excel('C:/Temp/Books.xlsx', index_col='ID')

根据Price = ListPrice * Discount这个公式。用代码可以表示为:

books['Price'] = books['ListPrice'] * books['Discount']

注:以上代码显示该计算是发生在books['Price'],books['ListPrice']和books['Discount']三个Series里面。即是列与列的运算,速度快效率高。

打印后结果

        Name  ListPrice  Discount  Price
ID                                      
1   Book_001         10       0.5    5.0
2   Book_002         20       0.5   10.0
3   Book_003         30       0.5   15.0
4   Book_004         40       0.5   20.0
5   Book_005         50       0.5   25.0
6   Book_006         60       0.5   30.0
7   Book_007         70       0.5   35.0
8   Book_008         80       0.5   40.0
9   Book_009         90       0.5   45.0
10  Book_010        100       0.5   50.0
11  Book_011        110       0.5   55.0
12  Book_012        120       0.5   60.0
13  Book_013        130       0.5   65.0
14  Book_014        140       0.5   70.0
15  Book_015        150       0.5   75.0
16  Book_016        160       0.5   80.0
17  Book_017        170       0.5   85.0
18  Book_018        180       0.5   90.0
19  Book_019        190       0.5   95.0
20  Book_020        200       0.5  100.0


如果想要实现一行一行(类似excel里的算法)的计算可以通过一个for循环:

for i in books.index:
books['Price'].at[i]=books['ListPrice'].at[i]*books['Discount'].at[i]

如果要指定某几行的计算可以使用range()

如计算第5到第16行:

for i in range(5,16):
books['Price'].at[i]=books['ListPrice'].at[i]*books['Discount'].at[i]


如果想对某一列(Series)进行加减运算,可以通过赋值的方法

如给ListPrice 上加2:

books['ListPrice'] = books['ListPrice'] + 2


或者使用Series的Series.apply()方法:

books['ListPrice'] = books['ListPrice'].apply(add_2)

注:add_2为自定义的一个函数

def add_2(x):
    return x + 2

输出结果:

        Name  ListPrice  Discount  Price
ID                                      
1   Book_001         12       0.5    5.0
2   Book_002         22       0.5   10.0
3   Book_003         32       0.5   15.0
4   Book_004         42       0.5   20.0
5   Book_005         52       0.5   25.0
6   Book_006         62       0.5   30.0
7   Book_007         72       0.5   35.0
8   Book_008         82       0.5   40.0
9   Book_009         92       0.5   45.0
10  Book_010        102       0.5   50.0
11  Book_011        112       0.5   55.0
12  Book_012        122       0.5   60.0
13  Book_013        132       0.5   65.0
14  Book_014        142       0.5   70.0
15  Book_015        152       0.5   75.0
16  Book_016        162       0.5   80.0
17  Book_017        172       0.5   85.0
18  Book_018        182       0.5   90.0
19  Book_019        192       0.5   95.0
20  Book_020        202       0.5  100.0


本节课代码:

import pandas as pd
def add_2(x):
    return x + 2

books = pd.read_excel('C:/Temp/Books.xlsx', index_col='ID')

books['Price'] = books['ListPrice'] * books['Discount']

# for i in books.index:
# for i in range(5,16):
# books['Price'].at[i]=books['ListPrice'].at[i]*books['Discount'].at[i]

#books['ListPrice'] = books['ListPrice'] + 2
books['ListPrice'] = books['ListPrice'].apply(add_2)

print(books)


[展开全文]
Lewin · 2018-10-11 · 函数填充 2

read_excel()方法可以使用xlrd Python模块读取Excel 2003(.xls)和Excel 2007+(.xlsx)文件。 to_excel()实例方法用于将DataFrame保存到Excel

people.shape 显示(行数,列数)

people.columns显示Index[Titile]

people.head(3)看前三行数据

people.coumns=[]手动设置header

header默认值为0,当一行为错误数据时可以将header改为1实现正确


[展开全文]

饿,TIM老师的这个方程其实是可以化简的,也不是很复杂

import pandas as pd
import numpy as np

# def get_circumcircle_area(l,h):
#     r = np.sqrt(l**2+h**2)/2
#     return r**2*np.pi

# def get_circumcircle_area(l,h):
#     return np.pi*(l**2+h**2)/4
#
# def wrapper(row):
#      return get_circumcircle_area(row['Length'],row['Height'])

rects = pd.read_excel('D:/Temp/Rectangles.xlsx',index_col='ID')
rects['CA'] = rects.apply(lambda row:np.pi*(row['Length']**2+row['Height']**2)/4,axis=1)

print(rects)


这样的话一行就可以了

[展开全文]

任务8:数据筛选,过滤

方法一:通过函数定义筛选条件

筛选数据的条件通常是通过函数的形式来表达的。因此对于目标excel的筛选条件我们要先定义相应的函数

def age_18_to_30(a):
#   return a >=18 and a <30  #常规写法
    return 18 <= a < 30  # Python 特有的表达式方式
def level_A(s):
    return 85 <= s <= 100

学习一下DataFrame里面的.loc[]属性。注意attribut后面跟的是【】,"loc"是“location”的缩写,意思是定义到某个位置,并将其保留下来。

students = students.loc[students['Age'].apply(age_18_to_30)].loc[students['Score'].apply(level_A)]

注:

- students.loc[].loc[]中两个.loc[]连着写目的是实现多条件筛选同时其书写的先后顺序也会影响实际筛选的先后顺序

- 复习上节课Series.apply()的用法,注意()里的函数名不要带()。


方法二:采用lambda表达式(了解内容)

采用lambda表达式可以省略函数定义,式整个代码变得更加简洁

students = students.loc[students['Age'].apply(lambda a: 18 <= a < 30)].loc[
    students['Score'].apply(lambda s: 85 <= s <= 100)]


学习DataFrame中列的另外一种表达方式:

表达方式1: students['Age']

表达方式2:students.Age

students = students.loc[students.Age.apply(age_18_to_30)].loc[students.Score.apply(level_A)]


本节代码:


# def age_18_to_30(a):
#   return a >=18 and a <30  #常规写法
#    return 18 <= a < 30  # Python 特有的表达式方式

# def level_A(s):
#    return 85 <= s <= 100

students = pd.read_excel('C:/Temp/Students.xlsx', index_col='ID')
# students = students.loc[students['Age'].apply(age_18_to_30)].loc[students['Score'].apply(level_A)]
students = students.loc[students['Age'].apply(lambda a: 18 <= a < 30)].loc[
    students['Score'].apply(lambda s: 85 <= s <= 100)]
# students = students.loc[students.Age.apply(age_18_to_30)].loc[students.Score.apply(level_A)]
print(students)

打印结果

           Name  Age  Score
ID                         
2   Student_002   26     92
6   Student_006   20     93
9   Student_009   18     85
19  Student_019   19     86
20  Student_020   20     94


[展开全文]

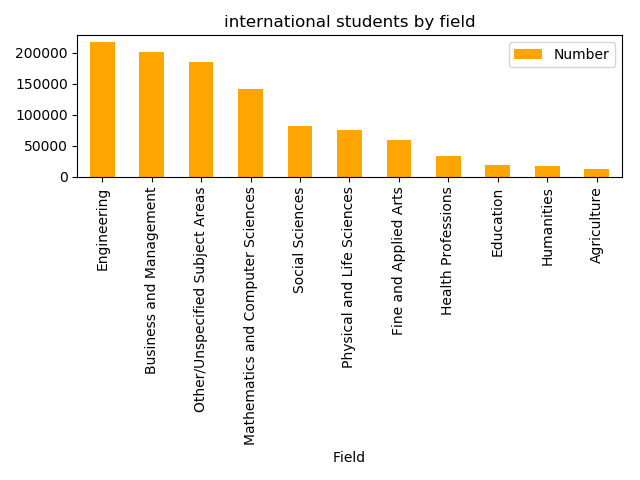
任务9: 柱状图

1.运用pandas绘制

首先引入matplotlib这个包下面的pyplot模块

import pandas as pd
import matplotlib.pyplot as plt

在DataFrane下面绘制棒图

students.plot.bar(x='Field', y='Number',color='orange',title='international students by field')
plt.tight_layout()
plt.show()

输出结果

2. 运用matplotlib绘制

plt.bar(students.Field,students.Number,color='orange')
plt.xticks(students.Field, rotation='90')
plt.xlabel('Field')
plt.ylabel('Number')
plt.title('international students by field', fontsize= 16)
plt.tight_layout()
plt.show()


可以看出matplotlib比pandas绘图更加方便一些


[展开全文]
Lewin · 2018-10-12 · 柱状图 1

 任务10:绘制分组柱图,深度优化图标

本节大部分内容各位上节课的复习内容。

import pandas as pd
import matplotlib.pyplot as plt

students = pd.read_excel('C:/Temp/Students.xlsx')
students.sort_values(by='2017', inplace=True, ascending=False)
print(students)
students.plot.bar(x='Field', y=['2016', '2017'], color=['orange', 'red'])
plt.title('International Students by Field', fontsize=16, fontweight='bold')
plt.xlabel('Field', fontweight='bold')
plt.ylabel('Number', fontweight='bold')
ax = plt.gca()
ax.set_xticklabels(students['Field'], rotation=45, ha='right')
f = plt.gcf()
f.subplots_adjust(left=0.2, bottom=0.42)
#plt.tight_layout()
plt.show()


几个注意的点:

1. 在定义x轴(x=)和y轴(y=)的时候,对于需要分组显示的部分要注意使用list,比如示例中的 y=['2016', '2017'], color=['orange', 'red'] 

2. pandas制图是基于matplotlib的。

3. 在优化title,xlabel, ylabel的时候修改字号,字体使用“fontsize=”,fontweight=' '。

4. 修改X/Y轴的一个函数 plt.gca()

用法:

ax = plt.gca()
ax.set_xticklabels(students['Field'], rotation=45, ha='right')

注:ha=’right‘意思是按照文字右上角为基点进行旋转。

5. 修改左右空白空间的函数plt.gcf()

用法:

f = plt.gcf()
f.subplots_adjust(left=0.2, bottom=0.42)


[展开全文]

任务12:绘制饼图时,需要加上:plt.axis('equal')确保饼图是一个正圆,否则为椭圆

[展开全文]
Weil_Lee · 2018-10-16 · 绘制饼图 1

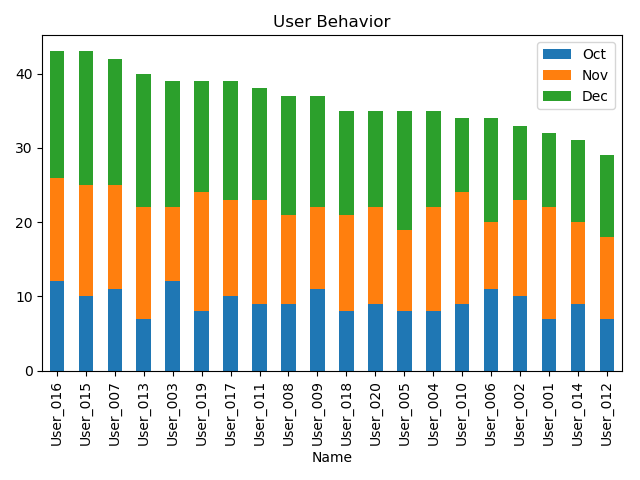
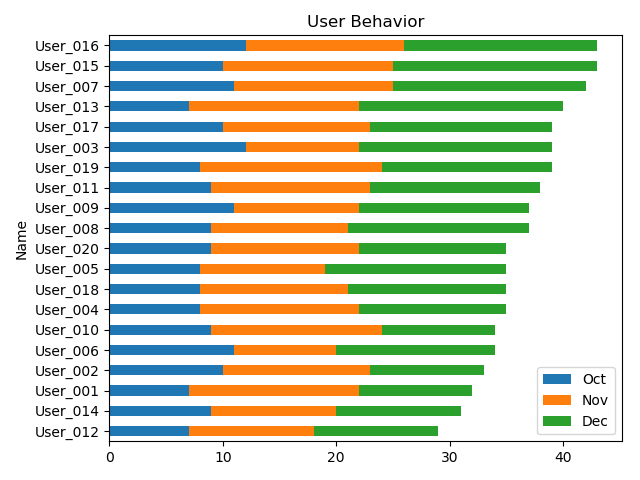
任务11:叠加柱状图,水平柱状图

在DataFrame里面新增加一列“Total”:

users['Total'] = users['Oct'] + users['Nov'] + users['Dec']

生成叠加柱状图:

users.plot.bar(x='Name', y=['Oct', 'Nov', 'Dec'], stacked=True, title='User Behavior')

注:Stached=True

生成水平柱状图:

users.plot.barh(x='Name', y=['Oct', 'Nov', 'Dec'], stacked=True, title='User Behavior')

注:users.plot.barh

本节代码:

import pandas as pd
import matplotlib.pyplot as plt

users = pd.read_excel('C:/Temp/Users.xlsx')
users['Total'] = users['Oct'] + users['Nov'] + users['Dec']
users.sort_values(by='Total', inplace=True, ascending=True)
print(users)

users.plot.barh(x='Name', y=['Oct', 'Nov', 'Dec'], stacked=True, title='User Behavior')
plt.tight_layout()
plt.show()

打印结果

    ID      Name  Oct  Nov  Dec  Total
11  12  User_012    7   11   11     29
13  14  User_014    9   11   11     31
0    1  User_001    7   15   10     32
1    2  User_002   10   13   10     33
5    6  User_006   11    9   14     34
9   10  User_010    9   15   10     34
3    4  User_004    8   14   13     35
17  18  User_018    8   13   14     35
4    5  User_005    8   11   16     35
19  20  User_020    9   13   13     35
7    8  User_008    9   12   16     37
8    9  User_009   11   11   15     37
10  11  User_011    9   14   15     38
18  19  User_019    8   16   15     39
2    3  User_003   12   10   17     39
16  17  User_017   10   13   16     39
12  13  User_013    7   15   18     40
6    7  User_007   11   14   17     42
14  15  User_015   10   15   18     43
15  16  User_016   12   14   17     43


end.


[展开全文]

 Series序列类似于dictionary

生成一个序列

d={'x':100,'y':200,'z':300}#字典/键值对

print(d.keys())#所有键

print(d.values())#所有值

print(d['x'])#具体一个值

s1=pd.Series(d)#字典转为序列

-----------------------------------

第二种创建序列方法

s1=pd.Series([100,200,300],index=['x','y','z'])

s1=pd.Series(data,index,name)#序列既不是行也不是列

s2=pd.Series(data,index,name)#序列只有加入DataFrame才能有行和列的区别,而这种区别是建立在加入时的方法不同上:两种加入法:dictonary 或者list


pd.DataFrame({s1.name:s1,s2.name:s2})#以dictonary加入当作列         

pd.DataFrame([s1,s2])   

pd.DataFrame(list)#以list加入当作行

index的作用:

对齐原则

有共同值则对齐,没有共同值的位置给一个NaN空

--------------------------------------

下节学习:使用Series进行快速填充

[展开全文]

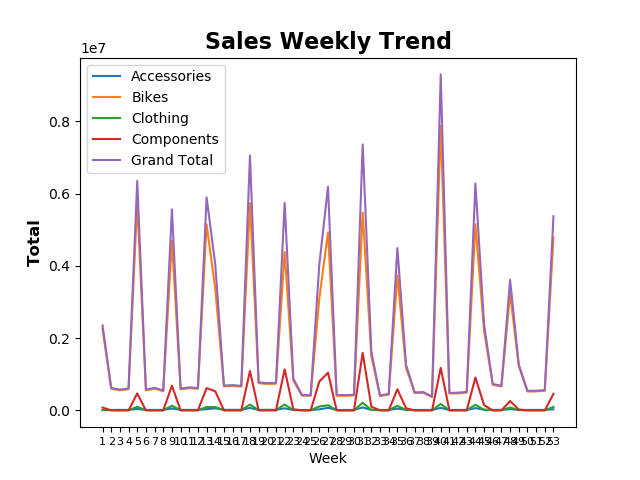
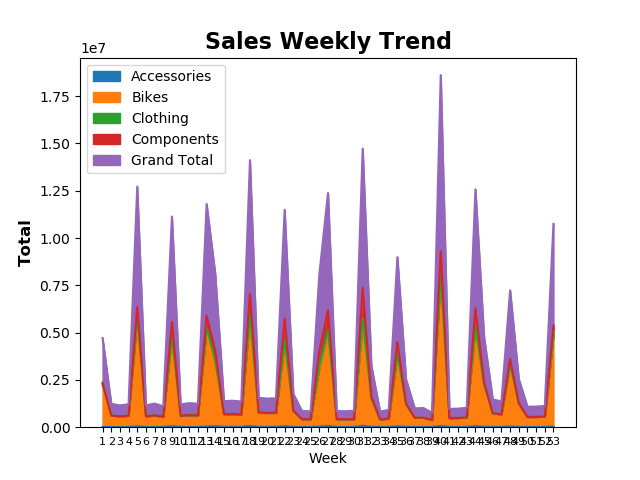
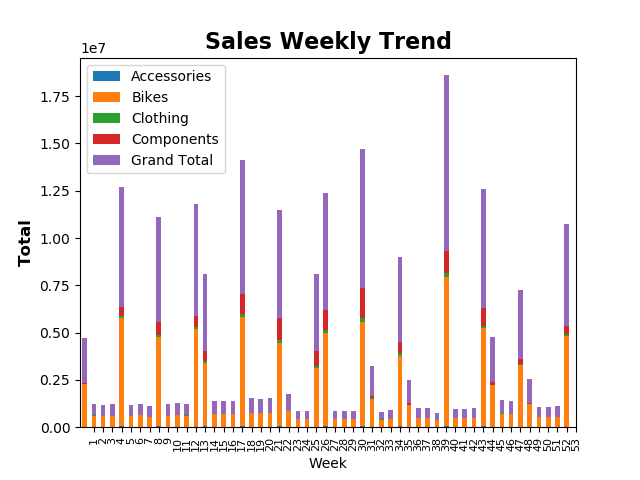
任务13:绘制折线趋势图、叠加区域图

!!!!本课下载下来的excel附件名字是Order.xlsx. 编辑代码时注意修改!!!

本课代码:

import pandas as pd
import matplotlib.pyplot as plt

weeks = pd.read_excel('C:/Temp/Orders.xlsx', index_col='Week')
print(weeks)
print(weeks.columns)

#weeks.plot.area(y=['Accessories', 'Bikes', 'Clothing', 'Components', 'Grand Total'])
weeks.plot.bar(y=['Accessories', 'Bikes', 'Clothing', 'Components', 'Grand Total'], stacked=True)
plt.title('Sales Weekly Trend', fontsize=16, fontweight='bold')
plt.ylabel('Total', fontsize=12, fontweight='bold')
plt.xticks(weeks.index, fontsize=8)
plt.show()

打印结果:

       Accessories         Bikes      ...         Components   Grand Total
Week                                  ...                                 
1      9939.465500  2.258337e+06      ...       7.872110e+04  2.356639e+06
2     12626.660000  6.005350e+05      ...       0.000000e+00  6.204234e+05
3     14414.950000  5.547708e+05      ...       0.000000e+00  5.759616e+05
4     12924.580000  5.892557e+05      ...       0.000000e+00  6.083717e+05
5     40443.498516  5.749222e+06      ...       4.709014e+05  6.360041e+06
6     13735.460000  5.539423e+05      ...       0.000000e+00  5.753385e+05
7     13588.800000  6.053847e+05      ...       0.000000e+00  6.247596e+05
8     13997.810000  5.320056e+05      ...       0.000000e+00  5.526938e+05
9     52392.263204  4.701389e+06      ...       6.852023e+05  5.567191e+06
10    14276.640000  5.815496e+05      ...       0.000000e+00  6.037474e+05
11    13584.320000  6.169319e+05      ...       0.000000e+00  6.372021e+05
12    14128.770000  5.985606e+05      ...       0.000000e+00  6.204505e+05
13    34372.148628  5.154563e+06      ...       6.173474e+05  5.899177e+06
14    58097.712659  3.361458e+06      ...       5.296900e+05  4.041540e+06
15    16287.020000  6.655744e+05      ...       0.000000e+00  6.894546e+05
16    15990.960000  6.749113e+05      ...       0.000000e+00  6.991723e+05
17    15120.710000  6.581411e+05      ...       0.000000e+00  6.795171e+05
18    67753.596201  5.739679e+06      ...       1.091392e+06  7.059584e+06
19    15416.040000  7.537814e+05      ...       0.000000e+00  7.770648e+05
20    16113.010000  7.323520e+05      ...       0.000000e+00  7.571492e+05
21    15903.150000  7.380932e+05      ...       0.000000e+00  7.620668e+05
22    57090.139277  4.388471e+06      ...       1.137457e+06  5.746683e+06
23    11900.146000  8.310402e+05      ...       3.152596e+04  8.824418e+05
24    11336.820000  4.095025e+05      ...       0.000000e+00  4.251703e+05
25    10573.210000  4.065446e+05      ...       0.000000e+00  4.232483e+05
26    29376.532664  3.101888e+06      ...       7.994845e+05  4.039316e+06
27    72003.211677  4.932875e+06      ...       1.043760e+06  6.191153e+06
28    11621.900000  4.086479e+05      ...       0.000000e+00  4.258483e+05
29    11640.460000  4.056193e+05      ...       0.000000e+00  4.225788e+05
30    12359.920000  4.156482e+05      ...       0.000000e+00  4.325679e+05
31    81276.364307  5.475372e+06      ...       1.593068e+06  7.363333e+06
32    15208.996500  1.494933e+06      ...       1.025128e+05  1.623856e+06
33    13187.100000  3.938290e+05      ...       0.000000e+00  4.135150e+05
34    13046.980000  4.383911e+05      ...       0.000000e+00  4.571066e+05
35    50187.449516  3.732927e+06      ...       5.842441e+05  4.495606e+06
36    15063.164000  1.173016e+06      ...       6.180437e+04  1.260751e+06
37    11505.920000  4.814773e+05      ...       0.000000e+00  4.985188e+05
38    13170.670000  4.883039e+05      ...       0.000000e+00  5.066807e+05
39    11278.600000  3.675468e+05      ...       0.000000e+00  3.845985e+05
40    70170.520320  7.878476e+06      ...       1.177747e+06  9.303972e+06
41    12441.460000  4.658615e+05      ...       0.000000e+00  4.834701e+05
42    12924.950000  4.715758e+05      ...       0.000000e+00  4.907546e+05
43    13314.310000  4.931541e+05      ...       0.000000e+00  5.127108e+05
44    62745.172581  5.156642e+06      ...       9.100149e+05  6.286165e+06
45    19630.003108  2.199453e+06      ...       1.478740e+05  2.381990e+06
46    14822.180000  7.092621e+05      ...       0.000000e+00  7.304781e+05
47    13728.300000  6.623922e+05      ...       0.000000e+00  6.830832e+05
48    36075.469500  3.240381e+06      ...       2.592590e+05  3.616344e+06
49    13642.418500  1.227307e+06      ...       2.369806e+04  1.273325e+06
50    12388.980000  5.217178e+05      ...       0.000000e+00  5.419306e+05
51    12852.400000  5.264518e+05      ...       0.000000e+00  5.455141e+05
52    13085.680000  5.412245e+05      ...       0.000000e+00  5.604452e+05
53    31315.891268  4.790804e+06      ...       4.568886e+05  5.375680e+06

[53 rows x 5 columns]
Index(['Accessories', 'Bikes', 'Clothing', 'Components', 'Grand Total'], dtype='object')

[展开全文]

def age_18_to_30(a):

      return  18<=a<=30

def  level_a(s):
     return  85<=s<=100

students=pd.read_excel('C:/temp/students.xlsx',index_col='ID')

students.loc[students['Age'].apply(age_18_to_30)].loc[students['Score'].apply(level_a)]

[展开全文]

matplotlib感觉和matlab很像

[展开全文]
老师资料里matplotlib里面的代码应该用的不是同一个文件了,要改一下

import numpy as np
import pandas as pd
import matplotlib.pyplot as plt

students = pd.read_excel('D:/Temp/Students10.xlsx')
students.sort_values(by='2017', inplace=True, ascending=False)
students.index = range(0, len(students))
print(students)

bar_width = 0.7
x_pos = np.arange(len(students) * 2, step=2)
plt.bar(x_pos, students['2016'], color='orange', width=bar_width)
plt.bar(x_pos + bar_width, students['2017'], color='red', width=bar_width)

plt.xticks(x_pos + bar_width / 2, students['Field'], rotation='90')
plt.title('International Student by Field', fontsize=16)
plt.xlabel('Field')
plt.ylabel('Number')
plt.tight_layout()
plt.show()
[展开全文]

授课教师

Tim老师

课程特色

视频(30)
下载资料(25)

学员动态

Marstapeworm 加入学习
alpha 加入学习
elllen 完成了 Code for 002
elllen 开始学习 Code for 002
elllen 完成了 创建文件